Showing posts with label Homemade. Show all posts

Friday, October 10, 2014

Best Pita Bread Ever with Creamy Homemade Tzatzkiki Sauce


Just yes. 

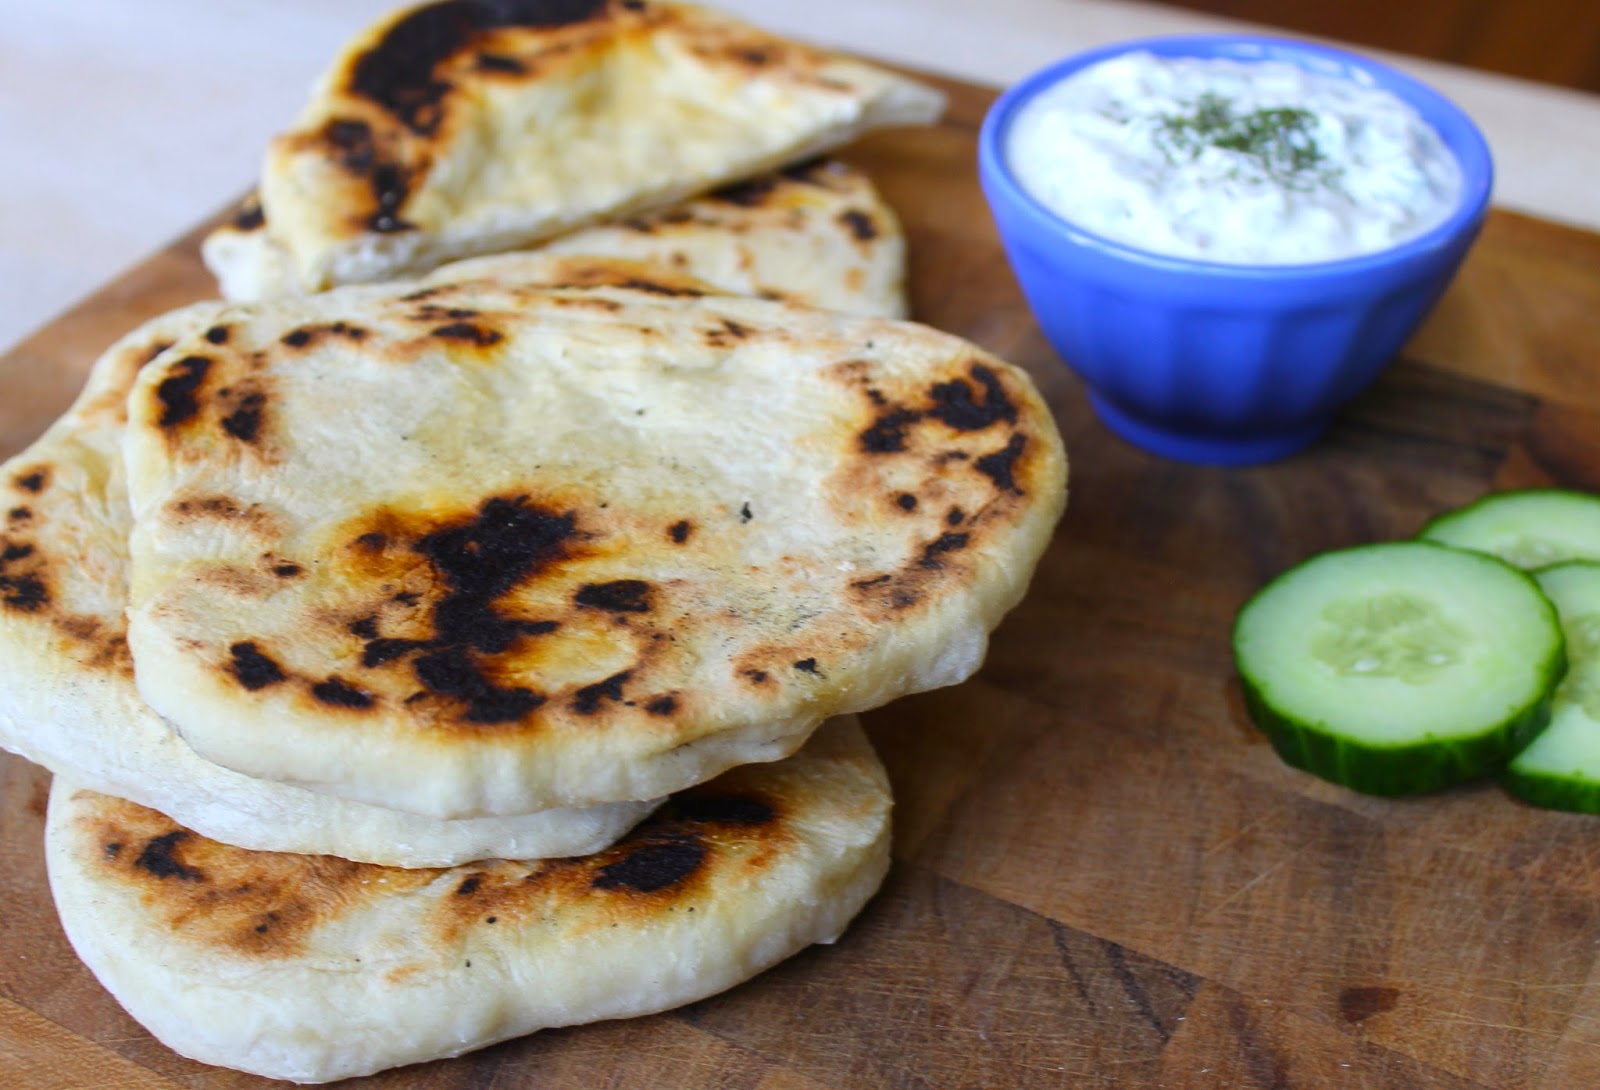
Russell and I may have a slight obsession with Mediterranean food but why not?! It's healthy, easy, and amazingly tasty! Since we had this obsession, we were visiting our favorite Mediterranean restaurant too often for our budget. So a few weeks ago we decided to try our own. Russell first started with the pita bread and after the first taste not only did he succeed but he passed my expectations. Seriously, it was the best pita I've ever had. For me personally, better than any restaurant pita I've had. Now this recipe will take a little more time and effort than our other recipes but we promise once you have these, you will never want another store bought pita again. Then we decided to take it even farther and go with the full package - Tzatziki sauce. Once again this sauce is healthy and so easy to make. I will be having this way too often from now on. For lunch we added chicken, feta, tomatoes, and onions for a perfect Mediterranean pita sandwich. We hope you enjoy! 

Ingredients

Pita Bread:

  • 1 cup hot Water, but not boiling
  • 2 teaspoons Active Dry or Instant Yeast (we used instant for this recipe)
  • 2-1/2 cups All-Purpose Flour  (may need to add a little more flour but do so sparingly)
  • 2 teaspoons Salt
  • 1 tablespoon Olive Oil

Tzatziki Sauce:

  • 16 ounces Plain Greek Yogurt (we used full fat - sorry diet)
  • 1 regular Cucumber, peeled, seeded, and diced small
  • 3 cloves Garlic, minced
  • 1 tablespoon White Wine Vinegar
  • 1 teaspoon Dried Dill
  • 1 teaspoon Dried Oregano
  • Half a fresh Lemon, juiced
  • 1 tablespoon Olive Oil


Directions

Pita Bread:

  1. Mix the yeast and hot water together, letting dissolve for ~5 minutes. 
  2. Using a stand mixer, add salt, olive oil, and 2-1/2 cups of flour to water mixture. Attach the dough hook and knead the dough on medium speed for 4-6 minutes until dough is smooth. You may add additional flour as needed to end up with a smooth and elastic dough. However, it is better to use too little flour than too much. 
  3. Place dough in greased bowl (I use olive oil) and turn until coated. Cover bowl and let dough rise until it's doubled (should take ~1 hour). 
  4. Once risen, deflate the dough and turn onto a lightly floured work surface. If not ready to bake, place dough in refrigerator for up to 4 days (Typically I only make 1/2 the pitas and save the other half for the next days meals). 
  5. Break off a small piece of dough (~2" ball) and gently flatten into a disk using a rolling pin (each disk should be 6-8" wide and 1/4" thick). Lift/turn the dough frequently as you flatten to make sure the dough doesn't stick to the counter. 
  6. Warm a cast iron skillet (using the iron skillet is the key to getting incredible pitas) over medium-high heat. Make sure the pan is good and hot prior to cooking any pitas. 
  7. Place flattened disk on pan and bake for 30-45 seconds, until bubbles begin to form. 
  8. Flip and cook for 1-2 minutes on other side. Pita will begin to puff up as toasted spots begin to form.  
  9. Flip additional time, cooking original side for an addition 1-2 minutes. Typically I cook each pita for a total of 4 minutes (I set timer for this time when I first place pita on the skillet) - exact time should be adjusted per your cooking surface/temperature and taste.
  10. Of course pitas are best eaten hot and fresh, but bread will keep in a bag for a few days as well!!

Tzatziki Sauce:

  1. Pour any liquid off the surface of the greek yogurt. (I used full fat here to make it thicker, but you can always go with 2% if you want it a little lighter)
  2. Mix together yogurt, diced cucumber, garlic, white wine vinegar, dill, oregano, salt and pepper to taste, and lemon juice. 
  3. Drizzle with olive oil.
  4. Refrigerate for at least 30 minutes before serving to allow the flavors to blend. 


Our next Mediterranean adventure will soon be hummus as that is our other obsession. But until then we hope you enjoy this insanely good, fresh pita bread and creamy tzatziki sauce!

Sunday, September 28, 2014

The Perfectly Creamy and Healthy Guacamole


Avocados are by far one of my favorite foods in the entire world, so naturally Guacamole was one of the first recipes I made sure to master.  Avocados are so delicious and naturally healthy for us however, not all guacamoles are made equal. That perfectly creamy guacamole you eat at restaurants is usually loaded with mayonnaise to give it that creamy consistency. That is why my recipe is so incredible. It is creamy and flavorful without the added fake fat. Guacamole is that perfect appetizer to have out whenever you have guests over from football sundays to week night dinners. Everyone loves guacamole. But, once you try this recipe you will never make it another way again. I always have people asking what I put in my guacamole and if I can make it again. So what's the secret ingredient? Feta! I know it sounds so strange but it works. It gives it the creamy texture and a little extra flavor. Try this recipe and I promise you won't be disappointed. 

Ingredients

  • 2 Ripe Avocados
  • 1/2 cup of diced Onions (red onion for stronger flavor, yellow onion for a more mild flavor)
  • 1/2 cup of diced Tomatoes. Make sure to get rid of the juices and seeds as you don't want watery guacamole 
  • Lemon Juice
  • Garlic (fresh or dried) I usually do around 1-2 garlic cloves. Depends on how strong you like the garlic flavor
  • 1/4 cup of Crumbled Feta 
  • Salt and Pepper to taste

Optional

  • Cilantro, chopped
  • Serrano Peppers, chopped- if you like it spicy!


 Directions

Mix together all ingredients. Mash however much you want. I tend to like mine a little in between mashed and chunky as you can see in the pictures- seems to make everyone happy. I like to always taste as I go with the spices and lemon juice. A good thing to remember is most of the time you are going to be eating this guacamole with salty chips so go lighter on the salt to balance the chips. If it is too bland, you can always add more! If you do end up going over board with the spices, more lemon juice works perfectly. Another trick with guacamole is make it ahead of time and let it sit in the fridge to marinate the flavors together before serving. 


Russell and I have this guacamole at least once a week. Hope you all enjoy and become as addicted as we are!


Sunday, September 21, 2014

Cranberry Lemon Kale Salad with Parmesan and Pine Nuts


Kale was a superfood I had yet to fully appreciate. I could mask the flavor in green smoothies but it wasn't until Pam introduced me to this salad that now I not only enjoy kale but actually crave it! This salad has a little bit of everything in it- sweet, salty, citrus, and fully satisfying. It is an easy go to healthy lunch option or a perfect dinner appetizer for when guests come over. 

Ingredients


Salad
  • 1 bunch of kale, stems removed, washed and patted dry
  • 1/3 cup of dried cranberries (or you can use raisins if you prefer)
  • 1/2 cup of pine nuts
  • freshly grated parmesan cheese
Dressing
  • Juice of one lemon
  • 1 tbsp olive oil
  • 1 tsp honey
  • salt and pepper to taste


Directions

  1. Prepare dressing by mixing together lemon juice, olive oil, honey, salt and pepper
  2. In a food processor (or if you don't have one I used my vitamix on a low speed) process kale into small chopped pieces
  3. Add chopped kale, pine nuts, cheese, and dried cranberries to dressing
  4. Mix everything together then serve into salad bowl


Healthy and delicious! Hope you enjoy!
How do you like to eat your superfood kale?

Monday, September 8, 2014

Healthier Oatmeal Chocolate Chip Cookies


Anyone who knows my husband knows that he loves to bake and makes deliciously naughty desserts. And anyone who knows me knows that I have an insane weakness for cookies. ANY type of cookie. Every now and then there is nothing wrong with indulging in sweets but baking was becoming an every week thing. So I decided now is the time that we start looking into slightly healthier options. For this recipe we took out butter from the recipe completely and added oats for less flour and sugar. Like I said, this is an intro into healthy desserts so it's not completely guilt- free but one step at a time right? These cookies might quickly become a new favorite. For me the hard part was to not eat all the dough and actually bake the cookies. These really are so good. Hope you enjoy!

Ingredients


  • 2 1/2 cups Old Fashioned Oats
  • 2 cups All Purpose Flour
  • 1/2 cup Granulated Sugar
  • 1 cup Brown Sugar
  • 1 teaspoon Baking Soda
  • 1 teaspoon Salt
  • 2/3 cup of Canola Oil (use a little more if dough seems too dry)
  • 2 large Eggs
  • 4 teaspoons Vanilla Extract
  • Semi- Sweet Chocolate Chips (however much chocolate you want!)
↣ You can also add or substitute nuts, dried fruit, coconut, or any other toppings you enjoy!


Directions

1. Preheat the oven to 350 degrees. Line a baking sheet with parchment paper
2. Mix together the oatmeal, flour, sugar, brown sugar, baking soda, salt, oil, eggs, and vanilla.
3. Beat until the dough is moist and all the ingredients are combined. Mix in the chocolate chips or whatever topping you chose!
4. Using your hands, clump together a tablespoon of dough and squeeze the dough into a ball. Place on prepared baking sheet.
5. Bake for 10-12 minutes or until golden.
6. Eat and enjoy while they are still warm!

Enjoy!


Can't you just see the gooey goodness?!
What are some ways you make your desserts healthier?

UA-55116700-1